托管在Netlify的博客更改记录
切换Git分支⌗
切换为 main⌗
两边博客分支不同,看灯大博客可以修改分支,开始操作。
git checkout master

git branch -m main

# 删除本地分支
git branch -d master

# 删除远程分支
git push origin --delete master

# (并不是真正想push, 只是隐式地将远程分支设置为了跟踪main)
git push origin -u main
网站配置⌗
在 Github repo 设置 -> Branches 里, 将默认分支设置为 main。
Netlify Build 设置里将默认分支设置成 main。
集成 Netlify CMS⌗
相关介绍⌗
Netlify CMS 主要是解决了,随时随地打开浏览器写markdown博客的问题,同时它自动处理了图片上传等问题。编辑器可以在富文本(所见即所得)和 Markdown 方式之间切换,Markdown模式没有语法高亮显示。
Netlify CMS = web 版的 markdown 文件管理器 + 自动图片上传并插入markdown代码 + 在web浏览器写markdown并自动推送到git仓库构建 ….
部署方法⌗
在static 目录下新建admin目录,里面放一个index.html 文件作为后台管理的入口。
static/admin/index.html 内容如下:
<!doctype html>
<html>
<head>
  <meta charset="utf-8" />
  <meta name="viewport" content="width=device-width, initial-scale=1.0" />
  <title>Blog Manager</title>
  <script src="https://identity.netlify.com/v1/netlify-identity-widget.js"></script>
</head>
<body>
  <!-- Include the script that builds the page and powers Netlify CMS -->
  <!-- https://www.jsdelivr.com/package/npm/netlify-cms -->
  <script src="https://cdn.jsdelivr.net/npm/netlify-cms@2.10.96/dist/netlify-cms.min.js"></script>

</body>
</html>
static/admin/config.yml 内容如下:
# https://www.netlifycms.org/docs/add-to-your-site/
backend:
  name: git-gateway
  branch: main # Branch to update (optional; defaults to master)
  squash_merges: true # beta feature

 # when using the default proxy server port
 # Run npx netlify-cms-proxy-server from the root dir of the repo
local_backend: true

# 编辑工作流程
publish_mode: editorial_workflow


# 全局静态文件上传目录
media_folder: "static/img/uploads" # Media files will be stored in the repo under images/uploads
public_folder: "/img/uploads" # The src attribute for uploaded media will begin with /images/uploads

media_folder_relative: true


collections:
  - name: "post" # Used in routes, e.g., /admin/collections/blog
    label: "Post" # Used in the UI
    folder: "content/post" # The path to the folder where the documents are stored
    path: '{{slug}}/index' # beta feature
    media_folder: ''
    public_folder: ''
    # adding a nested object will show the collection folder structure
    nested:
      depth: 100 # max depth to show in the collection tree
      summary: '{{title}}' # optional summary for a tree node, defaults to the inferred title field
    # adding a meta object with a path property allows editing the path of entries
    # moving an existing entry will move the entire sub tree of the entry to the new location
    meta: { path: { widget: string, label: 'Path', index_file: 'index', hint: 'markdown文件路径, 对于page bundle, 如 "一级目录/二级目录/page-bundle目录/index.md", 只需要填写 "一级目录/二级目录/page-bundle目录",不
要忘记填写page-bundle目录' } }
    create: true # Allow users to create new documents in this collection
    slug: "{{year}}-{{month}}-{{day}}-{{slug}}" # Filename template, e.g., YYYY-MM-DD-title.md
    fields: # The fields for each document, usually in front matter
      - {label: "Title", name: "title", widget: "string", hint: "文章标题"}
      - {label: "Slug", name: "slug", widget: "string", required: false, hint: "Slug可以是目录,如 linux/archlinux, 此项会作为路径的功能可能会被 path meta 覆盖"}
      - {label: "Draft", name: "draft", widget: "boolean", default: true, hint: "草稿不会 build"}
      - {label: "Publish Date", name: "date", widget: "datetime"}
      - {label: "Tags", name: "tags", widget: "list", required: false, "文章标签,用半角逗号分隔"}
      - {label: "Body", name: "body", widget: "markdown", hint: "博客正文"}
本地Git仓库模式⌗
简单启用,只需要在 config.yml 中添加 local_backend: true 即可。 然后 npx netlify-cms-proxy-server 启动 proxy 即可,它默认监听 8081 端口。 然后通过 hugo serve 启动,然后访问 http://localhost:1313/admin/ 即可。
启用CMS⌗
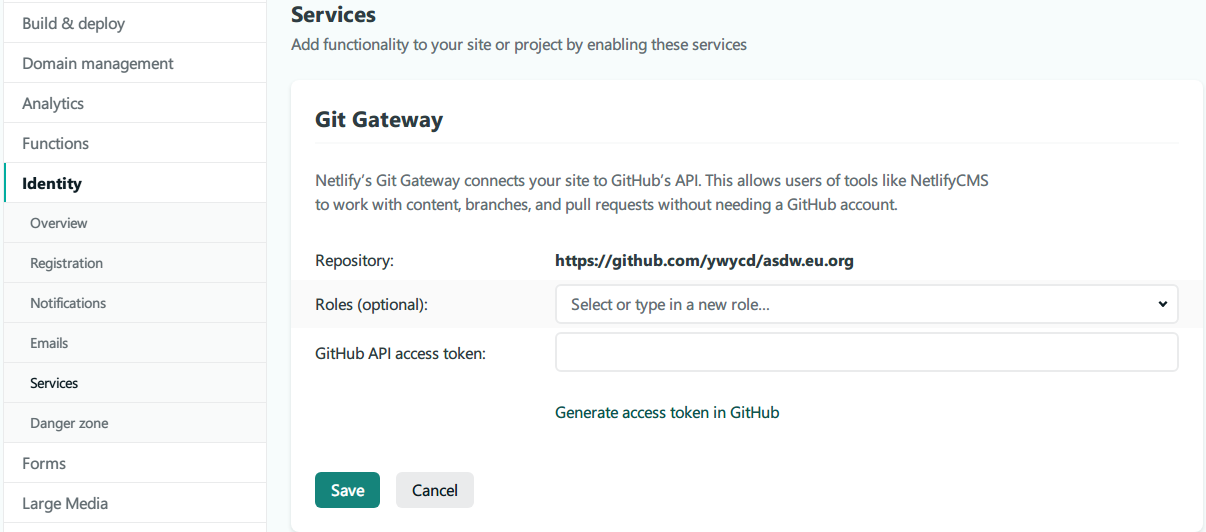
上面文件创建后,推送到git。点开https://xxx.netlify.app/admin/提示没有Git Gateway。
启用git-gateway 介绍,进netlify网页Site settings > Identity, 先enable Identity service。Identity > Services > Git Gateway, 选择Enable Git Gateway,同时生成token。
 再访问
再访问https://xxx.netlify.app/admin/注册账号,点击邮箱验证身份(博客地址加token)。但后面登陆时提示未激活。查阅
注册 后在External providers里选了github,授权登陆成功。后面测试邮箱可登陆,再不行可设置无验证。
 这里可查看注册账号,在Roles里可设置管理员权限。
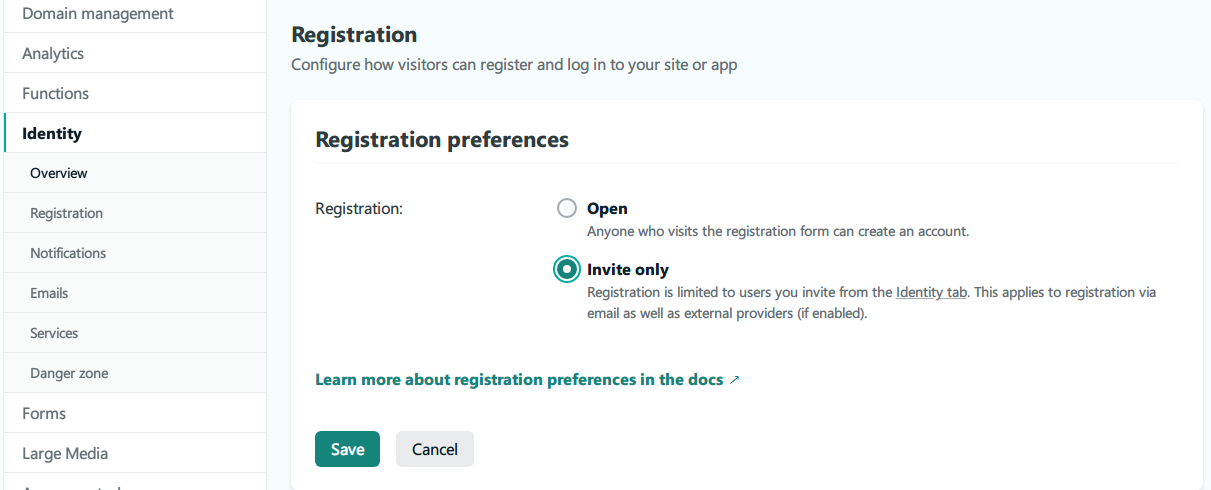 改为邀请注册,免费只能邀请5人。开放注册1000人,算活跃人数。
使用CMS编辑文章,打字经常字符消失,打不完一整句,切换模式也这样。编辑好保存,是pull requests到仓库,tags格式改变。还是电脑码字发布吧。